Reading List
The most recent articles from a list of feeds I subscribe to.
Adding backlinks to a GitHub wiki
Backlinks, or bi-directional liks, are becoming table-stakes for productivity apps since they’ve been popularized by Roam. It’s a simple concept: when you create a link from page A to page B, page B will also reference page A. With traditional hyperlinks, page B wouldn’t know about page A unless you explicitly link it back.
Backlinks allow a graph of knowledge to grow organically. When you create a doc for Orders, and mention Products, a Products page will be created or updated with a backlink. Even when not actively documenting Products, readers can get an idea of what they entail because of the linked references.
For example, Orders might reference Products.
Orders contain one or more [[Products]].
A system that supports backlinks would add a reference to the Products page.
## Backlinks
- [[Orders]]
- Orders contain one or more [[Products]].
Sometimes we use GitHub wiki for documentation. Documenting a large system can be difficult because there are a lot of interdependencies, and it’s not always obvious where something belongs. This is a challange for the writer (where does this go?) and for the reader (where can I find this?). Backlinks help out because they ensure something is mentioned in multiple places where relevant.
GitHub wikis are based on Markdown files. They’re also a plain git repository that supports GitHub Actions, so you can automate tasks. Andy Matuschak created note-link-janitor, a script that crawls files and adds backlinks to your Markdown notes. A fork of the script is also available as a GitHub Action, which you can configure to run whenever your wiki is updated.
Note-link-janitor indexes all your wiki style links, and creates a References section on the bottom of each page with backlinks.
To enable note-link-janitor, create a workflow file.
# .github/workflows/note-link-janitor.yml

name: Note Link Janitor

on:
 gollum:
 workflow_dispatch:

jobs:
 update:
 runs-on: self-hosted

 steps:
 - uses: actions/checkout@v2
 with:
 repository: ${{github.repository}}.wiki
 - uses: sander/note-link-janitor@v5
This workflow will run whenever the wiki is updated (the gollum event), or when triggered manually (workflow_dispatch). Whenever you use wiki-style links in your documentation, the Action will push a commit with newly generated backlinks.
Finding out which ports are in use
Sometimes you want to spin up a process, but the port it wants to bind to is already in use. Or a port isn’t listening to a process as you expected. lsof is a debugging life saver in these situations.
lsof -i -P -n | grep LISTEN
This will list all processes listening to a port.
nginx 514 sebastiandedeyne 7u IPv4 0x2718856ef232ee5b 0t0 TCP 127.0.0.1:80 (LISTEN)
nginx 514 sebastiandedeyne 8u IPv4 0x2718856ef233026b 0t0 TCP 127.0.0.1:443 (LISTEN)
nginx 514 sebastiandedeyne 9u IPv4 0x2718856ef2330c73 0t0 TCP 127.0.0.1:60 (LISTEN)
If you want to find a process on a specific port, you can chain another grep.
lsof -i -P -n | grep LISTEN | grep 80
nginx 514 sebastiandedeyne 7u IPv4 0x2718856ef232ee5b 0t0 TCP 127.0.0.1:80 (LISTEN)
Leaner feature branches
In most projects, we use git flow to some extent — depending on the project and team size. This includes feature branches.
Feature branches (or sometimes called topic branches) are used to develop new features for the upcoming or a distant future release. When starting development of a feature, the target release in which this feature will be incorporated may well be unknown at that point. The essence of a feature branch is that it exists as long as the feature is in development, but will eventually be merged back into develop (to definitely add the new feature to the upcoming release) or discarded (in case of a disappointing experiment).
Working on a project with a lot of interdependencies between features with a bigger team comes with a new set of challenges dealing with git.
We’ve recently set up a new guideline: if it’s not directly tied to your feature, don’t put it in your feature branch.
In practice, our instinct seems to be “work on the feature branch until the feature is complete” without thinking twice.
For example, you’re working on a dynamic footer feature in a multi-tenant app. The footer contains the tenant’s address (among other things). You want the tenant to store the address on their settings page and pull that data into the footer. You created a feature/footer branch from develop.
While you could keep everything on the footer branch, your team members (and sometimes users) are better off if you branch out. Create a new feature/address branch from develop to add the address settings, merge it into develop, and finally, bring feature/footer back up to date with develop.
If other developers are building something that requires the same derived feature, they don’t have to wait on the main feature to be merged in to continue.
This also keeps PRs smaller and more focussed, which means reviews will be easier and faster to process, which results in a tighter feedback loop.
Finally, if it turns out the main feature has a lot of rabbit holes, we can ship the derived feature on its own.
The hard part is identifying derived features as features, not as a bullet point on the main feature’s specs.
Introducing Laravel Google Fonts
Today, we’re launching a new Spatie package: Laravel Google Fonts. I’ve written about Google Fonts before. It’s a great font catalog, but the service has it’s downsides. First, fonts are hosted on a different domain than your app, so the browser needs to do an additional DNS lookup. Second, it’s Google. Privacy-minded visitors might not appreciate the trip to Silicon Valley.
Self-hosting fonts from Google Fonts isn’t a new idea, but it’s a tedious process. You need to download them, set up CSS, and keep them up to date over time. To make this process as smooth as possible, we created this package.
First, choose your fonts on fonts.google.com and grab the CSS URL.
https://fonts.googleapis.com/css2?family=Inter:wght@400;700&family=Recursive:wght@400;700&display=swap
Next, install the package and publish the config file. Paste the CSS URL in the default font set.
composer require spatie/laravel-google-fonts
// config/google-fonts.php

return [
'fonts' => [
'default' => 'https://fonts.googleapis.com/css2?family=Inter:ital,wght@0,400;0,700;1,400;1,700&display=swap',
],
];
Finally, use the @googlefonts Blade directive in your layout file to load them.
<!-- resources/views/layouts/app.blade.php -->
<head>
@googlefonts
</head>
When someone visits the site, your app will fetch the font files from Google’s servers, store them on a local disk, and serve them to the visitor. Once they’re cached, they’ll always be served from the local disk.
If you want to ensure the fonts are fetched before anyone visits your app, you can add this Artisan command to your deploy script:
php artisan google-fonts:fetch
For more examples and configuration options, head to the GitHub repository.
This is the first package I’ve written in a looooong time, and I had a lot of fun working on it! Thanks to Freek for helping out with the final touches and getting everything prepped for release.
Why we use `!important` with Tailwind
Tl;dr: We use !important because it solves annoying specificity issues. Despite being overkill in most situations, we haven’t come across any practical drawbacks from globally enabling it.
If you want to learn more about how we came to that conclusion and how CSS specificity works, read on!
Tailwind has a configuration option to mark all utilities as !important.
// tailwind.config.js
module.exports = {
important: true,
}
.p-4 {
padding: 1rem !important;
}
We enable this setting because utilities should always have the final say. This is a habit we inherited from ITCSS long before Tailwind existed. We weren’t building interfaces utility-first, but we were using utilities.
From Harry Roberts' introduction to ITCSS:
This layer beats – or ‘trumps’ – all other layers, and has the power to override anything at all that has gone before it. It is inelegant and heavy-handed, and contains utility and helper classes, hacks and overrides.
Most of the time, this doesn’t matter in Tailwind. When you style an element with utilities, the odds are slim that there will be clashes among them because they target a single CSS property.
<button class="px-2 font-semibold border">
This applies to padding-left, padding-right, font-weight, and border. No properties are declared twice. This is different when you want to override a component with utilities.
.card {
padding: 2rem;
}
.p-4 {
padding: 1rem;
}
<div class="card p-4">
In this example, the padding property gets applied twice. To ensure the utility wins, Tailwind places utilities after components in the generated CSS. The other way around, utilities would never win.
@tailwind base;
@tailwind components;
@tailwind utilities;
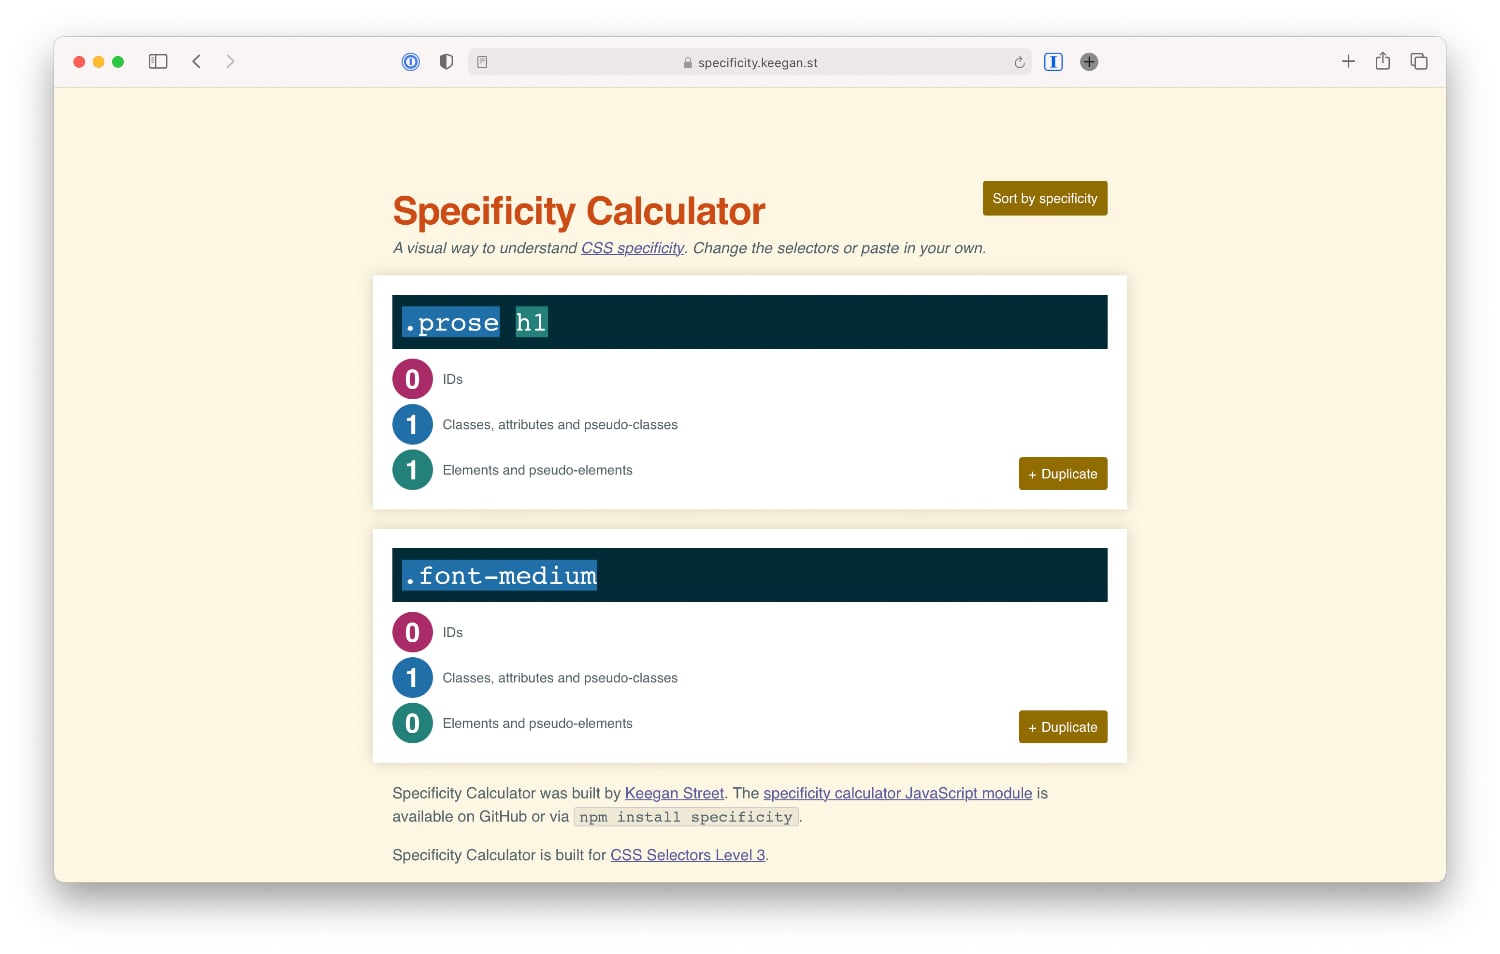
This falls apart when a component class has a higher specificity. For example, when using the @tailwindcss/typography .prose class.
<div class="prose">
<h1 class="font-medium">
</h1>
</div>
.prose h1 specifies font-weight: 800. The .font-medium class will never apply because .prose-h1 has a higher specificity.
This breaks our guiding principle: utilities should always have the final say. To work around these kinds of problems, we mark all utilities as !important.
Using !important for all utilities is like using a sledgehammer to hit a nail in the wall. Despite being overkill in most situations, we haven’t come across any practical drawbacks from globally enabling it.
Alternative methods
If you don’t like the idea of !important everywhere, Tailwind provides two more escape hatches.
The high specificity selector solution
Tailwind has another option: add a high specificty selector to all utilities.
// tailwind.config.js
module.exports = {
important: '#app',
}
The #app selector is arbitrary, as long as it has a high specificity like an ID. Tailwind will prepend all utilities with this selector.
#app .p-4 {
padding: 1rem;
}
This solves the .prose h1 vs. .font-medium problem because #app will always win.

The benefit is that you’re not forced to use !important when you want to override a utility. Yes, this breaks our “utilities should always have the final say” guideline. But I’ve come across situations where I want to override a utility with an inline style in JavaScript.
This example doesn’t work without !important with the important: true configuration:
<div class="flex" style="display: none;">
</div>
The downsides are that your stylesheet depends on an arbitrary selector to exist (you need to wrap everything in #app) and the noise it adds to the utilities' selectors (which is a minor issue).
We haven’t tried important: '#app' in a meaningful project yet—because we hadn’t found out about it before—but might in the future.
Tailwind JIT
Tailwind’s new Just-In-Time mode comes with an on-demand !important modifier.
<div class="prose">
<h1 class="!font-medium">
</h1>
</div>
With this modifier, we’d be able to keep !important out of our codebase and call upon it when needed. After further consideration, I don’t think we’ll be turning off !important for two reasons.
First, it makes it harder for developers with less CSS knowledge to contribute. They now have to make a conscious decision between an !important and non-!important utility.
Second, it can get confusing when we extract components. We’d need to add !important preemptively to ensure it renders as expected depending on the context.
<!-- Header -->
<h1 class="font-medium"></h1>
<!-- a) This works -->
<Header />
<!-- b) This doesn't -->
<div class="prose">
<Header />
</div>
By specifying CSS rules with !important, we can ensure they’re applied in no matter what context. Exactly what we want of utilities.
Resources
A lot of our opinions on CSS are based on Harry Roberts' guidelines. He wrote an article about !important on his blog, CSS Wizardry.
If you want to learn how specificity is calculated, read up on MDN. If you learn more about the cascade in general, I recommend this excellent article on CSS Tricks.