Reading List
The most recent articles from a list of feeds I subscribe to.
A list of new(ish) command line tools
Hello! Today I asked on twitter about newer
command line tools, like ripgrep and fd and fzf and exa and bat.
I got a bunch of replies with tools I hadn’t heard of, so I thought I’d make a list here. A lot of people also pointed at the modern-unix list.
replacements for standard tools
- ripgrep, ag, ack (grep)
- exa, lsd (ls)
- mosh (ssh)
- bat (cat)
- delta (a pager for git)
- fd (find)
- drill, dog (dig)
- duf (df)
- dust, ncdu (du)
- pgcli (psql)
- btm, btop, glances, gtop, zenith (top)
- tldr (man, sort of)
- sd (sed)
- difftastic (diff)
- mtr (traceroute)
- plocate (locate)
- xxd, hexyl (hexdump)
new inventions
Here are some tools that are not exactly replacements for standard tools:
- z, fasd, autojump, zoxide (tools to make it easier to find files / change directories)
- broot, nnn, ranger (file manager)
- direnv (load environment variables depending on the current directory)
- fzf, peco (“fuzzy finder”)
- croc and magic-wormhole (send files from one computer to another)
- hyperfine (benchmarking)
- httpie, curlie, xh (for making HTTP requests)
- entr (run arbitrary commands when files change)
- asdf (version manager for multiple languages)
- tig, lazygit (interactive interfaces for git)
- lazydocker (interactive interface for docker)
- choose (the basics of awk/cut)
- ctop (top for containers)
- fuck (autocorrect command line errors)
- tmate (share your terminal with a friend)
- lnav, angle-grinder (tools for managing logs)
- mdp, glow (ways to display markdown in the terminal)
- pbcopy/pbpaste (for clipboard <> stdin/stdout) maybe aren’t “new” but were mentioned a lot. You can use xclip to do the same thing on Linux.
JSON/YAML/CSV things:
- jq (a great JSON-wrangling tool)
- jc (convert various tools’ output into JSON)
- jo (create JSON objects)
- yq (like
jq, but for YAML). there’s also another yq - fq (like
jq, but for binary) - htmlq (like
jq, but for HTML) - fx (interactive json tool)
- jless (json pager)
- xsv (a command line tool for csv files, from burntsushi)
- visidata (“an interactive multitool for tabular data”)
- miller (“like awk/sed/cut/join/sort for CSV/TSV/JSON/JSON lines”)
grep things:
- pdfgrep (grep for PDF)
- gron (make JSON greppable)
- ripgrep-all (ripgrep, but also PDF, zip, ebooks, etc)
less-new tools
Here are a few of not-so-new tools folks mentioned aren’t that well known:
- pv (“pipe viewer”, gives you a progress bar for a pipe)
- vidir (from moreutils, lets you batch rename/delete files in vim)
- sponge, ts, parallel (also from moreutils)
some of my favourites
My favourites of these that I use already are entr, ripgrep, git-delta,
httpie, plocate, and jq.
I’m interested in trying out direnv, btm, z, xsv, and duf, but I
think the most exciting tool I learned about is vidir.
Implementing a toy version of TLS 1.3
Hello! Recently I’ve been thinking about how I find it fun to learn computer networking by implementing working versions of real network protocols.
And it made me wonder – I’ve implemented toy versions of traceroute, TCP and DNS. What about TLS? Could I implement a toy version of that to learn more about how it works?
I asked on Twitter if this would be hard, got some encouragement and pointers for where to start, so I decided to go for it.
This was really fun and I learned a little more about how involved real cryptography is – thanks to cryptopals, I already 100% believed that I should not invent my own crypto implementations, and seeing how the crypto in TLS 1.3 works gave me even more of an appreciation for why I shouldn’t :)
As a warning: I am really not a cryptography person, I will probably say some incorrect things about cryptography in this post and I absolutely do not know the history of past TLS vulnerabilities that informed TLS 1.3’s design.
All of that said, let’s go implement some cryptography! All of my hacky code is on github. I decided to use Go because I heard that Go has good crypto libraries.
the simplifications
I only wanted to work on this for a few days at most, so I needed to make some pretty dramatic simplifications to make it possible to get it done quickly.
I decided my goal was going to be to download this blog’s homepage with TLS. So I don’t need to implement a fully general TLS implementation, I just need to successfully connect to one website.
Specifically, this means that:
- I only support one cipher suite
- I don’t verify the server’s certificate at all, I just ignore it
- my parsing and message formatting can be extremely janky and fragile because I only need to be able to talk to one specific TLS implementation (and believe me, they are)
an amazing TLS resource: tls13.ulfheim.net
Luckily, before starting this I remembered vaguely that I’d seen a website that explained every single byte in a TLS 1.3 connection, with detailed code examples to reproduce every part. Some googling revealed that it was The New Illustrated TLS Connection.
I can’t stress enough how helpful this was, I looked at probably more than a hundred times and I only looked at the TLS 1.3 RFC for a few small things.
some cryptography basics
Before I started working on this, my understanding of TLS was:
- at the beginning there’s some sort of Diffie-Hellman key exchange
- you use the key exchange to somehow (how???) get an AES symmetric key and encrypt the rest of the connection with AES
This was sort of right, but it turns out it’s more complicated than that.
Okay, let’s get into my hacky toy TLS implementation. It hopefully goes without saying that you should absolutely not use this code for anything.
step 1: say hello
First we need to send a “Client Hello” message. For my purposes this has just 4 pieces of information in it:
- A randomly generated public key
- 32 bytes of random data (the “Client Random”)
- The domain name I want to connect to (
jvns.ca) - The cipher suites/signature algorithms we want to use (which I just copied from tls.ulfheim.net). This negotiation process is pretty important in general but I’m ignoring it because I only support one signature algorithm / cipher suite.
The most interesting part of this to me was part 1 – how do I generate the public key?
I was confused about this for a while but it ended up being just 2 lines of code.
privateKey := random(32)
publicKey, err := curve25519.X25519(privateKey, curve25519.Basepoint)
You can see the rest of the code to generate the client hello message here but it’s very boring, it’s just a lot of bit fiddling.
elliptic curve cryptography is cool
I am not going to give an explanation of elliptic curve cryptography here, but I just want to say how point out how cool it is that you can:
- generate a random 32-byte string as a private key
- “multiply” the private key by the curve’s base point to get the public key (this is elliptic curve “multiplication”, where
n * Pmeans “add P to itself n times”) - that’s it!!
I wrote “multiply” in scare quotes because this “multiplication” doesn’t let you multiply points on the elliptic curve by each other. You can only multiply a point by an integer.
Here’s the function signature of the X25519 function we use to do the
“multiplication”. You can see one of the arguments is called scalar and one
is called point. And the order of the arguments matters! If you switch them it
won’t do the right thing.
func X25519(scalar, point []byte) ([]byte, error)
I am not going to say more about elliptic curve cryptography here but I love how simple this is to use – it seems a lot straightforward than RSA where your private keys have to be prime numbers.
I don’t know if “you can use any 32-byte string as a private key” is true for all elliptic curves or just for this specific elliptic curve (Curve25519).
step 2: parse the server hello
Next the server says hello. This is very boring, basically we just need to parse it to get the server’s public key which is 32 bytes. Here’s the code though.
step 3: calculate the keys to encrypt the handshake
Now that we have the server’s public key and we’ve sent the server our public key, we can start to calculate the keys we’re going to use to actually encrypt data.
I was surprised to learn that there are at least 4 different symmetric keys involved in TLS:
- client handshake key/iv (for the data the client sends in the handshake)
- server handshake key/iv (for the data the server sends in the handshaek)
- client application key/iv (for the rest of the data the client sends)
- server application key/iv (for the rest of the data the server sends)
- I think also another key for session resumption, but I didn’t implement that
We start out by combining the server’s public key and our private key to get a shared secret. This is called “elliptic curve diffie hellman” or ECDH and it’s pretty simple: “multiply” the server’s private key by our public key:
sharedSecret, err := curve25519.X25519(session.Keys.Private, session.ServerHello.PublicKey)
This gives us a 32-byte secret key that both the client and the server has. Yay!
But we need 96 bytes (16 + 12) * 4 of keys in total. That’s more than 32 bytes!
time for key derivation
Apparently the way you turn a small key into more keys is called “key derivation”, and TLS 1.3 uses an algorithm called “HKDF” to do this. I honestly do not understand this but here is what my code to do it looks like.
It seems to involve alternately calling hkdf.Expand and hkdf.Extract over and
over again a bunch of times.
func (session *Session) MakeHandshakeKeys() {
	zeros := make([]byte, 32)
	psk := make([]byte, 32)
	// ok so far
	if err != nil {
		panic(err)
	}
	earlySecret := hkdf.Extract(sha256.New, psk, zeros) // TODO: psk might be wrong
	derivedSecret := deriveSecret(earlySecret, "derived", []byte{})
	session.Keys.HandshakeSecret = hkdf.Extract(sha256.New, sharedSecret, derivedSecret)
	handshakeMessages := concatenate(session.Messages.ClientHello.Contents(), session.Messages.ServerHello.Contents())

	cHsSecret := deriveSecret(session.Keys.HandshakeSecret, "c hs traffic", handshakeMessages)
	session.Keys.ClientHandshakeSecret = cHsSecret
	session.Keys.ClientHandshakeKey = hkdfExpandLabel(cHsSecret, "key", []byte{}, 16)
	session.Keys.ClientHandshakeIV = hkdfExpandLabel(cHsSecret, "iv", []byte{}, 12)

	sHsSecret := deriveSecret(session.Keys.HandshakeSecret, "s hs traffic", handshakeMessages)
	session.Keys.ServerHandshakeKey = hkdfExpandLabel(sHsSecret, "key", []byte{}, 16)
	session.Keys.ServerHandshakeIV = hkdfExpandLabel(sHsSecret, "iv", []byte{}, 12)
}
This was pretty annoying to get working because I kept passing the wrong arguments to things. The only reason I managed it was because https://tls13.ulfheim.net provided a bunch of example inputs and outputs and example code so I was able to write some unit tests and check my code against the site’s example implementation.
Anyway, eventually I got all my keys calculated and it was time to start decrypting!
an aside on IVs
For each key there’s also an “IV” which stands for “initialization vector”. The idea seems to be to use a different initialization vector for every message we encrypt/decrypt, for More Security ™.
In this implementation the way we get a different IV for each message is by xoring the IV with the number of messages sent/received so far.
step 4: write some decryption code
Now that we have all these keys and IVs, we can write a decrypt function.
I thought that TLS just used AES, but apparently it uses something called “authentication encryption” on top of AES that I hadn’t heard of before.
The wikipedia article explanation of authenticated encryption is actually pretty clear:
… authenticated encryption can provide security against chosen ciphertext attack. In these attacks, an adversary attempts to gain an advantage against a cryptosystem (e.g., information about the secret decryption key) by submitting carefully chosen ciphertexts to some “decryption oracle” and analyzing the decrypted results. Authenticated encryption schemes can recognize improperly-constructed ciphertexts and refuse to decrypt them. This, in turn, prevents the attacker from requesting the decryption of any ciphertext unless it was generated correctly using the encryption algorithm
This makes sense to me because I did some of the cryptopals challenges and there’s an attack a bit like this in cryptopals set 2 (I don’t know if it’s the exact same thing).
Anyway, here’s some code that uses authenticated encryption the way the TLS 1.3 spec says it should. I think GCM is an authenticated encryption algorithm.
func decrypt(key, iv, wrapper []byte) []byte {

	block, err := aes.NewCipher(key)
	if err != nil {
		panic(err.Error())
	}

	aesgcm, err := cipher.NewGCM(block)
	if err != nil {
		panic(err.Error())
	}

	additional := wrapper[:5]
	ciphertext := wrapper[5:]

	plaintext, err := aesgcm.Open(nil, iv, ciphertext, additional)
	if err != nil {
		panic(err.Error())
	}
	return plaintext
}
step 5: decrypt the server handshake
Next the server sends some more handshake data. This contains the certificate and some other stuff.
Here’s my code for decrypting the handshake. Basically it just reads the encrypted data from the network, decrypts it, and saves it.
record := readRecord(session.Conn)
if record.Type() != 0x17 {
    panic("expected wrapper")
}
session.Messages.ServerHandshake = decrypt(session.Keys.ServerHandshakeKey, session.Keys.ServerHandshakeIV, record)
You might notice that we don’t actually parse this data at all – that’s because we don’t need the contents, since we’re not verifying the server’s certificate.
I was surprised that you don’t technically need to look at the server’s certificate at all to make a TLS connection (though obviously you should verify it!). I thought you would need to at least parse it to get a key out of it or something.
We do need to be able to hash the handshake for the next step though, so we have to store it.
step 6: derive more keys
We use a hash of the SHA256 handshake data we just got from the server to generate even more symmetric keys. This is almost the last step!
This is almost exactly the same as the key derivation code from before, but I’m including it because I was surprised by how much work needed to be done to generate all these keys.
func (session *Session) MakeApplicationKeys() {
    handshakeMessages := concatenate(
        session.Messages.ClientHello.Contents(),
        session.Messages.ServerHello.Contents(),
        session.Messages.ServerHandshake.Contents())

    zeros := make([]byte, 32)
    derivedSecret := deriveSecret(session.Keys.HandshakeSecret, "derived", []byte{})
    masterSecret := hkdf.Extract(sha256.New, zeros, derivedSecret)

    cApSecret := deriveSecret(masterSecret, "c ap traffic", handshakeMessages)
    session.Keys.ClientApplicationKey = hkdfExpandLabel(cApSecret, "key", []byte{}, 16)
    session.Keys.ClientApplicationIV = hkdfExpandLabel(cApSecret, "iv", []byte{}, 12)

    sApSecret := deriveSecret(masterSecret, "s ap traffic", handshakeMessages)
    session.Keys.ServerApplicationKey = hkdfExpandLabel(sApSecret, "key", []byte{}, 16)
    session.Keys.ServerApplicationIV = hkdfExpandLabel(sApSecret, "iv", []byte{}, 12)
}
step 7: finish the handshake
Next we need to send a “handshake finished” message to the server to verify that everything is done. That code is here.
And now we’re done the handshake! That was the hard part, sending and receiving the data is relatively easy.
step 8: make a HTTP request
I wrote a SendData function that encrypts and sends data using our keys. This time we’re using the “application” keys and not the handshake keys. This made making a HTTP request pretty simple:
req := fmt.Sprintf("GET / HTTP/1.1\r\nHost: %s\r\n\r\n", domain)
session.SendData([]byte(req))
step 9: we can actually decrypt the response!!!
Now comes the moment I’d been waiting for — actually decrypting the response from the server!!! But here I needed to learn something else about TLS.
TLS data comes in blocks
I previously thought that once you established the connection, encrypted TLS data was just a stream. But that’s not how it works – instead, it’s transmitted in blocks. Like, you’ll get a chunk of ~1400 bytes to decrypt, and then another chunk, and then another chunk.
I’m not sure why the blocks have the size they do (maybe it’s so that each one will fit inside a TCP packet ???), but in theory I think they could be up to 65535 bytes, since their size field is 2 bytes. The blocks I got were all 1386 bytes each.
Every time we get a block, we have to:
- calculate a new IV as
old_iv xor num_records_received - decrypt it using the key and the new IV
- increment the count of records received
Here’s what the ReceiveData() function I wrote looks like.
The most interesting part of this is the iv[11] ^= session.RecordsReceived –
that’s the part that adjusts the IV for each block.
func (session *Session) ReceiveData() []byte {
	record := readRecord(session.Conn)
	iv := make([]byte, 12)
	copy(iv, session.Keys.ServerApplicationIV)
	iv[11] ^= session.RecordsReceived
	plaintext := decrypt(session.Keys.ServerApplicationKey, iv, record)
	session.RecordsReceived += 1
	return plaintext
}
This iv[11] thing assumes that there are less than 255 blocks which obviously
is not true in general in TLS, but I was lazy and to download my blog’s
homepage I only needed 82 blocks.
We actually have to do this when we send data too, but I didn’t implement it because we only sent 1 packet.
problem: getting the whole block of tLS data
I ran into one problem with TCP where sometimes I’d try to read a block of TLS data (~1386 bytes), but I wouldn’t get the whole thing. I guess the TLS blocks can be split up across multiple TCP packets.
I fixed this in a really dumb way, by just polling the TCP connection in a loop until it gave me the data I wanted. Here’s my code to do that:
func read(length int, reader io.Reader) []byte {
	var buf []byte
	for len(buf) != length {
		buf = append(buf, readUpto(length-len(buf), reader)...)
	}
	return buf
}
I assume a real TLS implementation would use a thread pool or coroutines or something to manage this.
step 10: knowing when we’re done
When the HTTP response is done, we get these bytes: []byte{48, 13, 10, 13, 10, 23}.
This seems to be because my HTTP server is using chunked transfer encoding, so
there’s no Content-Length header and I need to watch for those bytes at the
end instead.
So here’s the code to receive the HTTP response. Basically we just loop until we see those bytes, then we stop.
func (session *Session) ReceiveHTTPResponse() []byte {
	var response []byte
	for {
		pt := session.ReceiveData()
		if string(pt) == string([]byte{48, 13, 10, 13, 10, 23}) {
			break
		}
		response = append(response, pt...)
	}
	return response
}
that’s it!
Finally, I ran the program and I downloaded my blog’s homepage! It worked! Here’s what the results look like:
$ go build; ./tiny-tls
HTTP/1.1 200 OK
Date: Wed, 23 Mar 2022 19:37:47 GMT
Content-Type: text/html
Transfer-Encoding: chunked
Connection: keep-alive
... lots more headers and HTML follow...
Okay, the results are kind of anticlimactic, it’s just the same as what you’d
see if you ran curl -i https://jvns.ca except with no formatting. But I was
extremely excited when I saw it.
unit tests are great
Every time I write networking code like this, I forget that unit testing is good, and I thrash around with a bunch of parsing / formatting code that does not work and just getting NOPE messages back from the server on the other end.
And then I remember unit tests. In this case, I copied a bunch of the data from the https://tls13.ulfheim.net example and put it into my unit tests so that I could quickly make sure that my parsing and crypto were working correctly. It made everything about 10 times easier and faster.
some things I learned
This was really fun! I learned that
- elliptic curve diffie-hellman is very cool, and at least with Curve25519 you can use literally any 32-byte string as a private key
- there are a LOT of different symmetric keys involved in TLS and the key derivation process is pretty complicated
- TLS uses AES with some extra “authenticated encryption” algorithms on top
- TLS data is sent/received as a bunch of blocks, not as a stream
My code truly is terrible, it can connect to my site (jvns.ca) and I think literally no other sites.
I won’t pretend to understand all the reasons TLS is designed this way, but it was a fun way to spend a couple of days, I feel a little more informed, and I think it’ll be easier for me to understand things I read about TLS in the future.
a plug for cryptopals
If you want to learn about cryptography and you haven’t tried the cryptopals challenges, I really recommend them – you get to implement a lot of attacks on crypto systems and it’s very fun.
Celebrate tiny learning milestones
Hello! Today I want to talk about – how do you know you’re getting better at programming?
One obvious approach is:
- make goals
- periodically check if you achieved those goals
- if you did, celebrate
I kind of hate goals
Goals can be useful, but a lot of the time I actually find them stressful and not that helpful. For example, here are a few goals I wrote down for myself 9 years ago:
- write a nontrivial amount of C code that works and is used by actual people
- contribute to an open source project in C
- learn C++
9 years later, I have done 0 of those things. With the “goal” framing, it’s to think of this as a bad thing! Like, I wanted to learn C++ and I didn’t! I still can’t write C comfortably! Oh no! I guess I failed!
I find this framing depressing and unhelpful. In reality, I didn’t have any real reason to learn C++ then and I still don’t now. So it makes sense that I haven’t learned it.
Instead of goals, I like to think about tiny milestones.
what’s a milestone?
Usually when we talk about milestones we mean something big that only happens every few years, like “I graduated from university”.
But in this post I want to talk about milestones in the sense of its etymology – stones placed every mile on a highway, so that you can track your progress along a path.
These happen much more often – maybe you used a new tool for the first time, or you fixed a new type of bug that you’ve never seen before, or you learned about a new concept!
a few of my tiny C milestones
Here are a few examples of tiny milestones from the last 9 years that are spiritually related to my original “learn C/C++” goals.
I’m pretty sure that each of these individually took less than a week, though all together they took many years and a lot of them would have been impossible for me at the beginning.
- wrote a tiny Linux kernel module that does almost nothing
- learned about
strace - wrote a very basic shell in C with a friend
- learned how ELF binaries are organized (symbols, sections, etc)
- learned how to use
gdbto inspect a C program’s memory - learned a little about how how
gdbactually works internally (using DWARF) - learned the diffence between static and dynamic linking
- learned how to look at how a program is linked with
lddorfile - (years later) debugged a problem that was caused by dynamic linking
- implemented a buffer overflow exploit using
gdbandstrace(for a CTF) - got a core dump for a crashing C++ program and managed to get a stack trace out of it
- learned about the RAII pattern (though in Rust, not C++)
- learned what a few basic x86 assembly instructions mean (
mov, etc) - pair programmed with a friend who already knew x86 assembly on implementing one Advent of Code problem (Day 1) in x86 assembly
- in general I’m comfortable writing very basic C programs as long as they don’t have to do anything fancy like “memory management”
And there were even some major milestones, like I wrote a Ruby profiler in Rust in 2018.
When I think about it this way, I feel really good about my skills! I’ve learned all kinds of stuff related to systems programming, it just happened in a different way than I originally expected.
fixing a bug can be a milestone
Every time I solve a bug that I couldn’t have solved before, I think of it as a tiny milestone. For example, I’ve been trying to get better at CSS. One big part of that for me is diving deeper into CSS bugs I encounter instead of giving up.
Last year, I was having a problem with a flexbox. It was something that I vaguely felt had happened to me before but that I’d never been able to fix, and it made me feel like I didn’t understand how flexbox worked.
But instead of just finding a workaround, I decided to try to understand what was actually happening. And I ended up finding a blog post that explained what was happening – Flexbox Containers, PRE tags and managing Overflow. And that was really the cause of my bug!
changing goals isn’t a bad thing
The reason I still haven’t learned C isn’t that I suck or that C is impossible to learn. It’s just that learning how to write C well was never actually something I had a real reason to do.
Instead I learned Rust and Go and strace and gdb and about C structs and
symbols and the call stack and the heap and lots of other things. (as an aside, I loved this paper Some were meant for C
about how why C is still so important)
And that worked great! So I think it’s much more healthy to be flexible about your goals and to celebrate the milestones you do end up getting to instead of feeling bad about goals that you “failed” at.
you can learn a lot by “accident”
Most of my tiny milestones came up naturally because I had a project I wanted to do or a bug I needed to solve. So I didn’t need to explicitly plan for them, they just kind of happened along the way because I kept doing projects that challenged me.
celebrate your tiny milestones
It’s really helpful for me to celebrate tiny milestones like this. I celebrate a lot by writing blog posts – I wrote the above list mostly by looking at my list of old blog posts for things I’d written about related to C.
If you don’t blog (it’s definitely not for everyone!), it can be helpful to write down this kind of thing in your brag document instead.
But I do think it’s important to celebrate these milestones somewhere. It gives me a real sense that I’m making progress and it helps me stay motivated to keep learning about the thing.
How to use undocumented web APIs
Hello! A couple of days I wrote about tiny personal programs, and I mentioned that it can be fun to use “secret” undocumented APIs where you need to copy your cookies out of the browser to get access to them.
A couple of people asked how to do this, so I wanted to explain how because it’s pretty straightforward. We’ll also talk a tiny bit about what can go wrong, ethical issues, and how this applies to your undocumented APIs.
As an example, let’s use Google Hangouts. I’m picking this not because it’s the most useful example (I think there’s an official API which would be much more practical to use), but because many sites where this is actually useful are smaller sites that are more vulnerable to abuse. So we’re just going to use Google Hangouts because I’m 100% sure that the Google Hangouts backend is designed to be resilient to this kind of poking around.
Let’s get started!
step 1: look in developer tools for a promising JSON response
I start out by going to https://hangouts.google.com, opening the network tab in Firefox developer tools and looking for JSON responses. You can use Chrome developer tools too.
Here’s what that looks like
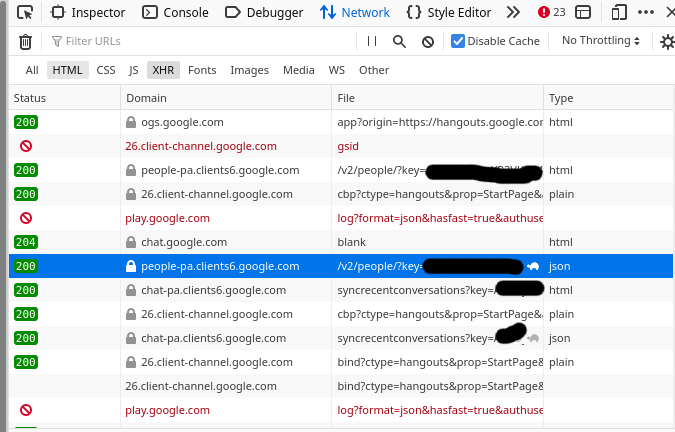
The request is a good candidate if it says “json” in the “Type” column”
I had to look around for a while until I found something interesting, but eventually I found a “people” endpoint that seems to return information about my contacts. Sounds fun, let’s take a look at that.
step 2: copy as cURL
Next, I right click on the request I’m interested in, and click “Copy” -> “Copy as cURL”.
Then I paste the curl command in my terminal and run it. Here’s what happens.
$ curl 'https://people-pa.clients6.google.com/v2/people/?key=REDACTED' -X POST ........ (a bunch of headers removed)
Warning: Binary output can mess up your terminal. Use "--output -" to tell
Warning: curl to output it to your terminal anyway, or consider "--output
Warning: <FILE>" to save to a file.
You might be thinking – that’s weird, what’s this “binary output can mess up
your terminal” error? That’s because by default, browsers send an
Accept-Encoding: gzip, deflate header to the server, to get compressed
output.
We could decompress it by piping the output to gunzip, but I find it simpler
to just not send that header. So let’s remove some irrelevant headers.
step 3: remove irrelevant headers
Here’s the full curl command line that I got from the browser. There’s a lot here!
I start out by splitting up the request with backslashes (\) so that each header is on a different line to make it easier to work with:
curl 'https://people-pa.clients6.google.com/v2/people/?key=REDACTED' \
-X POST \
-H 'User-Agent: Mozilla/5.0 (X11; Linux x86_64; rv:96.0) Gecko/20100101 Firefox/96.0' \
-H 'Accept: */*' \
-H 'Accept-Language: en' \
-H 'Accept-Encoding: gzip, deflate' \
-H 'X-HTTP-Method-Override: GET' \
-H 'Authorization: SAPISIDHASH REDACTED' \
-H 'Cookie: REDACTED'
-H 'Content-Type: application/x-www-form-urlencoded' \
-H 'X-Goog-AuthUser: 0' \
-H 'Origin: https://hangouts.google.com' \
-H 'Connection: keep-alive' \
-H 'Referer: https://hangouts.google.com/' \
-H 'Sec-Fetch-Dest: empty' \
-H 'Sec-Fetch-Mode: cors' \
-H 'Sec-Fetch-Site: same-site' \
-H 'Sec-GPC: 1' \
-H 'DNT: 1' \
-H 'Pragma: no-cache' \
-H 'Cache-Control: no-cache' \
-H 'TE: trailers' \
--data-raw 'personId=101777723309&personId=1175339043204&personId=1115266537043&personId=116731406166&extensionSet.extensionNames=HANGOUTS_ADDITIONAL_DATA&extensionSet.extensionNames=HANGOUTS_OFF_NETWORK_GAIA_GET&extensionSet.extensionNames=HANGOUTS_PHONE_DATA&includedProfileStates=ADMIN_BLOCKED&includedProfileStates=DELETED&includedProfileStates=PRIVATE_PROFILE&mergedPersonSourceOptions.includeAffinity=CHAT_AUTOCOMPLETE&coreIdParams.useRealtimeNotificationExpandedAcls=true&requestMask.includeField.paths=person.email&requestMask.includeField.paths=person.gender&requestMask.includeField.paths=person.in_app_reachability&requestMask.includeField.paths=person.metadata&requestMask.includeField.paths=person.name&requestMask.includeField.paths=person.phone&requestMask.includeField.paths=person.photo&requestMask.includeField.paths=person.read_only_profile_info&requestMask.includeField.paths=person.organization&requestMask.includeField.paths=person.location&requestMask.includeField.paths=person.cover_photo&requestMask.includeContainer=PROFILE&requestMask.includeContainer=DOMAIN_PROFILE&requestMask.includeContainer=CONTACT&key=REDACTED'
This can seem like an overwhelming amount of stuff at first, but you don’t need to think about what any of it means at this stage. You just need to delete irrelevant lines.
I usually just figure out which headers I can delete with trial and error – I
keep removing headers until the request starts failing. In general you probably
don’t need Accept*, Referer, Sec-*, DNT, User-Agent, and caching
headers though.
In this example, I was able to cut the request down to this:
curl 'https://people-pa.clients6.google.com/v2/people/?key=REDACTED' \
-X POST \
-H 'Authorization: SAPISIDHASH REDACTED' \
-H 'Content-Type: application/x-www-form-urlencoded' \
-H 'Origin: https://hangouts.google.com' \
-H 'Cookie: REDACTED'\
--data-raw 'personId=101777723309&personId=1175339043204&personId=1115266537043&personId=116731406166&extensionSet.extensionNames=HANGOUTS_ADDITIONAL_DATA&extensionSet.extensionNames=HANGOUTS_OFF_NETWORK_GAIA_GET&extensionSet.extensionNames=HANGOUTS_PHONE_DATA&includedProfileStates=ADMIN_BLOCKED&includedProfileStates=DELETED&includedProfileStates=PRIVATE_PROFILE&mergedPersonSourceOptions.includeAffinity=CHAT_AUTOCOMPLETE&coreIdParams.useRealtimeNotificationExpandedAcls=true&requestMask.includeField.paths=person.email&requestMask.includeField.paths=person.gender&requestMask.includeField.paths=person.in_app_reachability&requestMask.includeField.paths=person.metadata&requestMask.includeField.paths=person.name&requestMask.includeField.paths=person.phone&requestMask.includeField.paths=person.photo&requestMask.includeField.paths=person.read_only_profile_info&requestMask.includeField.paths=person.organization&requestMask.includeField.paths=person.location&requestMask.includeField.paths=person.cover_photo&requestMask.includeContainer=PROFILE&requestMask.includeContainer=DOMAIN_PROFILE&requestMask.includeContainer=CONTACT&key=REDACTED'
So I just need 4 headers: Authorization, Content-Type, Origin, and Cookie. That’s a lot more manageable.
step 4: translate it into Python
Now that we know what headers we need, we can translate our curl command into a Python program!
This part is also a pretty mechanical process, the goal is just to send exactly the same data with Python as we were with curl.
Here’s what that looks like. This is exactly the same as the previous curl
command, but using Python’s requests. I also broke up the very long request body
string into an array of tuples to make it easier to work with
programmmatically.
import requests
import urllib

data = [
    ('personId','101777723'), # I redacted these IDs a bit too
    ('personId','117533904'),
    ('personId','111526653'),
    ('personId','116731406'),
    ('extensionSet.extensionNames','HANGOUTS_ADDITIONAL_DATA'),
    ('extensionSet.extensionNames','HANGOUTS_OFF_NETWORK_GAIA_GET'),
    ('extensionSet.extensionNames','HANGOUTS_PHONE_DATA'),
    ('includedProfileStates','ADMIN_BLOCKED'),
    ('includedProfileStates','DELETED'),
    ('includedProfileStates','PRIVATE_PROFILE'),
    ('mergedPersonSourceOptions.includeAffinity','CHAT_AUTOCOMPLETE'),
    ('coreIdParams.useRealtimeNotificationExpandedAcls','true'),
    ('requestMask.includeField.paths','person.email'),
    ('requestMask.includeField.paths','person.gender'),
    ('requestMask.includeField.paths','person.in_app_reachability'),
    ('requestMask.includeField.paths','person.metadata'),
    ('requestMask.includeField.paths','person.name'),
    ('requestMask.includeField.paths','person.phone'),
    ('requestMask.includeField.paths','person.photo'),
    ('requestMask.includeField.paths','person.read_only_profile_info'),
    ('requestMask.includeField.paths','person.organization'),
    ('requestMask.includeField.paths','person.location'),
    ('requestMask.includeField.paths','person.cover_photo'),
    ('requestMask.includeContainer','PROFILE'),
    ('requestMask.includeContainer','DOMAIN_PROFILE'),
    ('requestMask.includeContainer','CONTACT'),
    ('key','REDACTED')
]
response = requests.post('https://people-pa.clients6.google.com/v2/people/?key=REDACTED',
    headers={
        'X-HTTP-Method-Override': 'GET',
        'Authorization': 'SAPISIDHASH REDACTED',
        'Content-Type': 'application/x-www-form-urlencoded',
        'Origin': 'https://hangouts.google.com',
        'Cookie': 'REDACTED',
    },
    data=urllib.parse.urlencode(data),
)

print(response.text)
I ran this program and it works – it prints out a bunch of JSON! Hooray!
You’ll notice that I replaced a bunch of things with REDACTED, that’s because
if I included those values you could access the Google Hangouts API for my
account which would be no good.
and we’re done!
Now I can modify the Python program to do whatever I want, like passing different parameters or parsing the output.
I’m not going to do anything interesting with it because I’m not actually interested in using this API at all, I just wanted to show what the process looks like.
But we get back a bunch of JSON that you could definitely do something with.
curlconverter looks great
Someone commented that you can translate curl to Python (and a bunch of other languages!) automatically with https://curlconverter.com/ which looks amazing – I’ve always done it manually. I tried it out on this example and it seems to work great.
figuring out how the API works is nontrivial
I don’t want to undersell how difficult it can be to figure out how an unknown API works – it’s not obvious! I have no idea what a lot of the parameters to this Google Hangouts API do!
But a lot of the time there are some parameters that seem pretty straightforward,
like requestMask.includeField.paths=person.email probably means “include each
person’s email address”. So I try to focus on the parameters I do understand
more than the ones I don’t understand.
this always works (in theory)
Some of you might be wondering – can you always do this?
The answer is sort of yes – browsers aren’t magic! All the information browsers send to your backend is just HTTP requests. So if I copy all of the HTTP headers that my browser is sending, I think there’s literally no way for the backend to tell that the request isn’t sent by my browser and is actually being sent by a random Python program.
Of course, we removed a bunch of the headers the browser sent so theoretically the backend could tell, but usually they won’t check.
There are some caveats though – for example a lot of Google services have backends that communicate with the frontend in a totally inscrutable (to me) way, so even though in theory you could mimic what they’re doing, in practice it might be almost impossible. And bigger APIs that encounter more abuse will have more protections.
Now that we’ve seen how to use undocumented APIs like this, let’s talk about some things that can go wrong.
problem 1: expiring session cookies
One big problem here is that I’m using my Google session cookie for authentication, so this script will stop working whenever my browser session expires.
That means that this approach wouldn’t work for a long running program (I’d want to use a real API), but if I just need to quickly grab a little bit of data as a 1-time thing, it can work great!
problem 2: abuse
If I’m using a small website, there’s a chance that my little Python script could take down their service because it’s doing way more requests than they’re able to handle. So when I’m doing this I try to be respectful and not make too many requests too quickly.
This is especially important because a lot of sites which don’t have official APIs are smaller sites with less resources.
In this example obviously this isn’t a problem – I think I made 20 requests total to the Google Hangouts backend while writing this blog post, which they can definitely handle.
Also if you’re using your account credentials to access the API in a excessive way and you cause problems, you might (very reasonably) get your account suspended.
I also stick to downloading data that’s either mine or that’s intended to be publicly accessible – I’m not searching for vulnerabilities.
remember that anyone can use your undocumented APIs
I think the most important thing to know about this isn’t actually how to use other people’s undocumented APIs. It’s fun to do, but it has a lot of limitations and I don’t actually do it that often.
It’s much more important to understand that anyone can do this to your backend API! Everyone has developer tools and the network tab, and it’s pretty easy to see which parameters you’re passing to the backend and to change them.
So if anyone can just change some parameters to get another user’s information, that’s no good. I think most developers building publicly availble APIs know this, but I’m mentioning it because everyone needs to learn it for the first time at some point :)
Some tiny personal programs I've written
I was talking to a friend last summer about what resources might be helpful for folks learning to program. My friend said they thought some people might benefit from a list of small and fun programming projects – the kind of thing you can do in an evening or weekend.
So let’s talk about that! I like to write small programs that have some marginal utility in my life. Kind of like this:
- ah! A minor problem in my life!
- I know, I bet I can solve this problem with CODE. YAY.
- 4 hours of happy programming ensues
This isn’t always the most practical (many of the problems I’ve solved with programming could have been solved in less time in other ways), but as long as your goal is actually to have fun programming and your programs don’t hurt anyone else, I think this is a great approach :)
So here are a few examples of small personal programming projects I’ve done. I’m not going to talk about “learning projects” where my goal was to learn something specific because I’ve already written a billion blog posts about that.
These are more about just doing something fun with no specific learning goal.
a theatre festival didn’t have a calendar
The local Fringe Festival had a bunch of shows, but there was no place I could see a calendar all one one page. So I wrote a Python script to scrape their website and generate a calendar. Here’s the code and the output.
printing out covers for tiny books
I saw a TikTok video recently where someone made miniature physical versions of the ebooks they read. I decided to try it out, so I needed to print tiny versions of a bunch of book covers. I could have resized all of them manually, but I decided to do it with programming instead.
So I wrote a little bit of HTML and CSS (tinybooks.html), converted it to a PDF, and printed it out.
getting my scanner to work better
This is barely “programming”, but I needed to scan a bunch of documents for a
family member, and I didn’t like the available software. So I wrote a tiny shell script wrapper for scanimage to
make the process simpler. This one actually helped me a lot and I still use it when
scanning.
getting a vaccine appointment
When the second COVID vaccine doses opened up, all of the slots were full. It turned out that the website’s backend had an API, so I wrote a script to poll the API every 60 seconds or so and watch for cancellations and notify me so that I could get an earlier appointment.
This didn’t turn out to be necessary (more appointments opened up pretty soon anyway and there were enough for everyone), but it was fun.
In general I try to be careful when using APIs like this in a way the developers didn’t intend to avoid overloading the site.
looking at housing market data
We were thinking of buying a condo a few years ago and I was mad that I couldn’t get any information about historical prices, so I wrote an iPython notebook that queried the API of a local real estate website to scrape some information and calculate some statistics like price per square foot over time.
I don’t think this actually helped us at all with buying a condo but it was fun.
(“using the API of local services” seems to be an ongoing theme, one of my favourite things is to use secret undocumented APIs where you need to copy your cookies out of the browser to get access to them)
crossword business cards
in 2013, I thought it might be fun to have a business card that was a crossword with some of my interests. So I wrote general software to generate crosswords from a text file. I’m pretty sure never printed the business cards but it was fun to write.
generating envelopes
I was mailing some zines a while ago, and I decided I wanted to print custom labels on every envelope – sort of a “mail merge” situation. So I wrote a Python program to go through all of the mailing address and generate some HTML and CSS. Then I turned the HTML/CSS into a PDF and printed the envelopes. This worked great.
investigating dice rolling patterns
A friend showed me a dice rolling game where you roll a bunch of dice and add up the values. I mentioned that if you roll enough dice and add up all the values, at some point it gets a lot less “random”.
But then I wanted to see exactly how much less random it gets. So I wrote a tiny program to roll 2500 dice and add up the resulting sums a bunch of times to see how it works. (presumably you could calculate the same thing with math, but it’s easier with code)
This was so little code I’ll just inline it here. (it’s Python). Here’s [the output](https://gist.github.com/jvns/e4a35ca2bad90c1a0fcaf578a803b456
import random

def roll():
    return sum(random.randint(1, 6) for i in range(2500))

while True:
    print(roll())
getting drawings into the Notability app
I was using an app called Squid to do drawing, and I was switching to Notability and wanted to get my old drawings into Notability. So I reverse engineered the Notability file format.
I don’t think this was ultimately that useful (I ultimately ended up switching to a different drawing app which had a real SVG import), but I had fun.
turning off retweets
This is a slightly less tiny project (it took more than one day), but I decided I didn’t want to see retweets on Twitter anymore so I wrote a small website so I could turn off retweets.
I really love tiny projects
All of these examples are more recent, but I think that when I was starting to learn to program tiny low-stakes projects like this really helped me. I love that
- they’re just for me (if it goes wrong, it doesn’t matter!)
- I can finish them in an evening or weekend (it’s not a Huge Giant Thing hanging over my head)
- if it works, there’s some tangible output in my life (like some envelopes or miniature books or a schedule a business card or a better Twitter experience)